
Last Updated: November 14, 2026
Quick Summary
An ergonomic office setup arranges your chair, desk, monitor, and keyboard so your body stays supported while you work. Start by setting your chair so your feet are flat, your lower back is supported, and your shoulders are relaxed. Then set your desk, keyboard, and monitor so your elbows, wrists, and neck stay in neutral positions.
Ergonomic office setup is the practice of arranging your desk, chair, monitors, and keyboard so your body stays in a comfortable, supported position while you work. For a deeper guide on natural relief for desk worker neck pain, see the steps that address this specific problem.
The University of Minnesota recommends that your upper arms hang parallel to your body and that your chair back support the natural curve of your lower back (University of Minnesota ergonomic office space fact sheet).
Research on workstation adjustments also supports this approach. A study led by N. van Vledder compared adjusting chair and screen height against people’s usual workstation settings, looking at pain and sitting comfort (van Vledder study on workstation chair and screen height).
Key goals for a back-friendly desk:
Start with your chair, since it strongly influences how your pelvis and lower spine are supported while you sit. Adjust it in this order so each setting builds on the last.
Your feet matter as much as your seat. If your feet dangle, you lose stability and push weight into your lower back. Use a footrest if your chair is too high to let your feet rest on the floor.
Watch out: Do not raise your chair so high that your desk sits above your elbows. That forces your shoulders up and adds strain to your neck.
A chair that fits one person may not fit another. Check that the seat depth and footrest suit your height, and that the backrest supports your mid-back. If you have limited mobility or a specific condition, a seating specialist or occupational therapist can help you adapt these principles.
If you cannot hit three or more of these, adjust the chair before moving on to the desk. A chair that is wrong makes every later step harder.
Your desk and keyboard set the position of your arms and wrists. When they are wrong, your shoulders tense up, and that tension often shows up as neck and upper back pain. The fix is to measure, not guess.
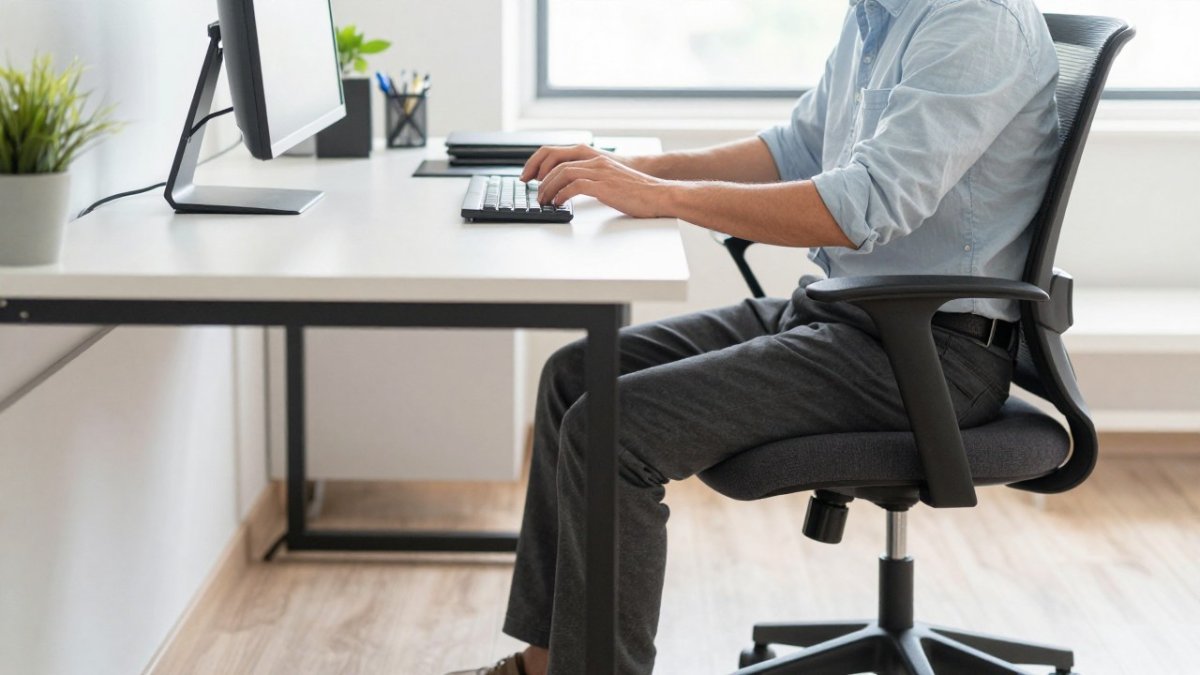
Sit in your adjusted chair with your shoulders relaxed. Bend your elbows to about 90 degrees and let your upper arms hang parallel to your body, as the University of Minnesota guidance recommends (University of Minnesota ergonomic office space fact sheet).
If your desk is fixed and too high, raise the chair and add a footrest so your feet stay supported.
Watch out: Do not use a wrist rest as a place to lean while typing. It is for resting between keystrokes, not during them.
A laptop screen and keyboard are too close together for most people to use comfortably for long stretches. Raise the laptop on a stand or a stack of books so the screen is at eye level, then add an external keyboard and mouse at elbow height. With the screen, keyboard, and mouse positioned independently, the rest of the workstation can support a more balanced posture, as Statements by J considers in relation to contemporary office furniture.
If your employer provides your workstation, you can ask for an ergonomic assessment or an accommodation. Under the Americans with Disabilities Act, employees with a qualifying disability can request reasonable accommodations, and the Job Accommodation Network (JAN), a service of the U.S. Department of Labor’s Office of Disability Employment Policy, offers free guidance on workstation changes (Job Accommodation Network). The Occupational Safety and Health Administration also publishes computer workstation ergonomics guidance that you can share with an employer (OSHA computer workstations eTool).
If you check fewer than four of these, adjust the desk or keyboard before moving on to the monitor.
The article’s guidance on desk and keyboard placement comes down to a few measurable targets.
| Setting | Target | Note |
|---|---|---|
| Elbow angle | About 90 degrees | Upper arms hang parallel to the body |
| Keyboard height | At or just below elbow height | Typically about 23 to 28 inches from the floor |
| Wrist position | Straight while typing | Use a wrist rest only between keystrokes |
| Mouse placement | Close to body, at keyboard height | Avoid reaching for it all day |
| Laptop use | Raise screen, add external keyboard | Keeps the screen at eye level |
Screen position often causes neck pain. If you constantly look down or crane forward, your neck muscles work hard all day.
Set your monitor so:
For two-monitor setups, place the main screen directly in front of you and the second screen at a similar height and distance. Avoid positioning either screen to the side, since that forces you to twist your neck repeatedly.
Use this checklist to test your setup in under five minutes:
If you check fewer than five items, adjust that part of your setup first.
A complete ergonomic workstation setup covers more than one piece of furniture. Work through these areas:
A complete setup often works better than one fix alone.
You do not need expensive furniture to improve your ergonomic office setup. Many useful changes cost little or nothing:
These steps help renters and anyone working with a limited budget. Keep the changes simple and reversible.
If your back or neck pain continues despite changes to your desk, talk with a professional. Clarendon Chiropractic takes an integrative approach that looks at the causes of pain, not just the symptoms.
Persistent or worsening pain, numbness, or weakness should be checked by a qualified clinician promptly. For a closer look at your own posture and back pain, you can book a complimentary consultation.
Learn more about treatment options for neck pain and low back pain that may be linked to how you sit. When you are ready, you can book a chiropractic visit in Clarendon Hills to talk through your symptoms.
A well-adjusted workstation can reduce strain on the lower back by supporting the natural curve of the spine. The University of Minnesota’s ergonomic guidance recommends adjusting the seat back to provide lumbar support and keeping upper arms parallel to the body. Workstation changes address posture, but they do not replace a clinical evaluation. If back pain persists, worsens, or spreads into the legs, consult a qualified healthcare professional for an individual assessment.
The top of the monitor should sit at or just below eye level so your neck stays in a neutral position rather than tilting down for long periods. The screen should be roughly an arm’s length away. Many people use a monitor riser or stack books under the screen to reach the right height. Check that you can see the full screen without leaning forward, and adjust if you notice tension in the neck or shoulders after a workday.
Place your primary monitor directly in front of you and the second monitor beside it at the same height, angled slightly inward. Keep both screens at eye level and about an arm’s length away. Avoid constantly turning your head to one side; if you use the second screen often, position it where your eyes can move comfortably without rotating your neck. Keep the keyboard and mouse centered on the primary screen so your shoulders stay relaxed.
Shifting position and standing up periodically helps reduce the strain of prolonged sitting. Many ergonomic guides suggest changing posture regularly and taking short movement breaks throughout the workday rather than waiting for discomfort to build. Even brief standing or walking breaks can help. The right schedule depends on your job and physical tolerance, so treat these as general guidelines and discuss persistent symptoms with a qualified professional.


